Setup of the Pix-Link wireless repeater is simple and easy via setup.pix-link.net. The repeater can be set up in two ways. The Pix-Link WIFI range extender boosts existing WIFI to 1200Mbps with a stable signal and 360° of coverage. Just follow the steps below.
Method 1: Pix-Link Setup Via a Web Browser
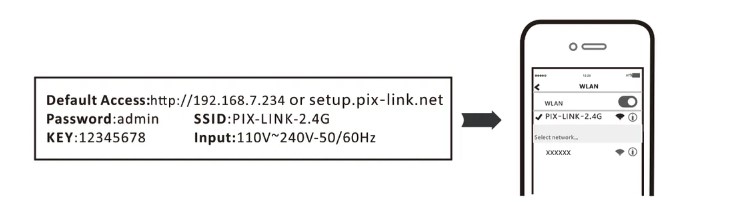
- To use the repeater’s network with your computer or mobile device, connect to the PIX-LINK-2.46/PIX-LINK-5.8G network. The factory default password is 12345678. If your computer is connected to the Internet via Ethernet, disconnect it. The default wireless name is displayed on the repeater’s bottom label.
- Simply open up your preferred web browser and navigate to either http://192.168.7.1 or setup.pix-link.net. To proceed with login, please enter the password: admin.
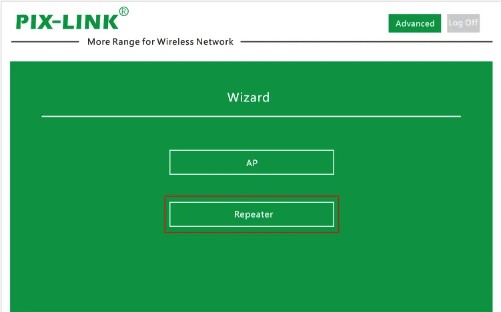
- Select Repeater Mode from the menu.
- The system can detect nearby wireless networks by itself.
- Enter the repeater SSID and pass phrase after selecting the Home WIFI. The default repeater SSID is xxxx-2.4G-EXT. Then click Apply to finish the configuration.
- Please keep in mind that the pass phrase is the same as your home router password.
- A successful connection to your router should cause the repeater LED to turn solid on.
- Connect the repeater midway between your router and the area with poor Wi-Fi. Your chosen location must be within range of your router. Wait around 2 minutes for the signal LED to turn solid blue. If it does not, move the repeater closer to the router to improve signal quality.
Method 2: Pix-Link Setup Via the WPS Button
- On your router, press the WPS button.
- Press the WPS button on the repeater for 1 second within 2 minutes. The LED on the repeater should change from blinking to steady on to indicate a successful connection. Note: If the LED on the repeater does not flash solidly, try again or use Method 1 or Method 2
Configure Pix-Link as AP Mode (Access Point)
- First, ensure that the extender is plugged into an electrical outlet.
- Wait until the power indicator LED turns light green. If the power LED does not illuminate, depress the on/off button
- Use an Ethernet cable to connect the extender’s Ethernet port to a router’s Ethernet LAN port or a remote access device.
- Ethernet LAN port with LAN connectivity The extension connects to the LAN and produces a hotspot for Wi-Fi.
- Use a Wi-Fi network manager on a computer or Wi-Fi-enabled device to locate and connect to the Pix-link EXT (SSID) Wi-Fi network. The connection is established with the PC or Wi-Fi device, and the Device Link LED illuminates.
- Open any web browser and enter setup.pix-link.net in the URL bar to view the New Extender Setup screen.
- Additionally, click the NEW EXTENDER SETUP button. The Extender Setup display appears.
- Then, fill out the boxes on the Pix-link Extender Setup screen and click Next. Click the access point button next.
- Click the Next button after configuring the network name (SSID), security option, and password for each access point network. Your preferences have been applied.
- The Pix-link extender is prepared for access point operation. Use a Wi-Fi network manager on your computer or Wi-Fi device to connect to the new Wi-Fi network access point.