Having a weak Wi-Fi signal can be frustrating, especially when you’re trying to stream movies, play games, or get some work done. Fortunately, there’s a solution: the Opticover Extender. This device is designed to boost your Wi-Fi signal and provide coverage to areas of your home that may not be getting a strong signal. In this article, we’ll walk you through the Opticover Extender setup process, so you can start enjoying a stronger and more reliable Wi-Fi connection.
How to set up your Opticover Extender
Before you start setting up your Opticover Extender, make sure you have the following items:
- Opticover Extender
- Wi-Fi router
- Computer, laptop, or mobile device
- Ethernet cable (optional)
Now, let’s get started with the Opticover Extender setup process:
Step 1: Find the ideal location– The first step in setting up your Opticover Extender is finding the right location. You want to place the extender in an area where it can receive a strong signal from your Wi-Fi router. Some tips for finding the ideal location include:
- Placing the extender in a central location in your home
- Avoiding areas with thick walls or other obstructions
- Keeping the extender away from other electronics that may cause interference
Step 2: Connect your Opticover Extender to your Wi-Fi router– Once you’ve found the ideal location for your Opticover Extender, it’s time to connect it to your Wi-Fi router. To do this, follow these steps:
- Plug the Opticover Extender into an electrical outlet near your Wi-Fi router.
- Wait for the power light on the extender to turn on.
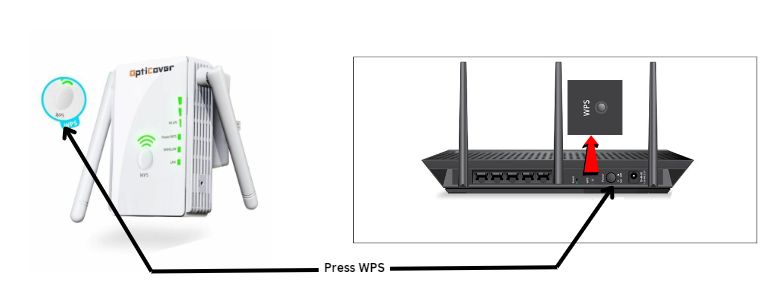
- Press the WPS button on your Wi-Fi router.
- Within two minutes, press the WPS button on your Opticover Extender.
If your Wi-Fi router doesn’t have a WPS button, you can connect your Opticover Extender using an Ethernet cable. Simply connect one end of the cable to your extender and the other end to your router.
Step 3: Connect your devices to your Opticover Extender– Now that your Opticover Extender is connected to your Wi-Fi router, it’s time to connect your devices to the extender. To do this, follow these steps:
- On your computer, laptop, or mobile device, go to the Wi-Fi settings.
- Look for the Wi-Fi network that has “Opticover” in the name.
- Select this network and enter the password provided with your extender.
- Wait for your device to connect to the Opticover network.
Once your device is connected to the Opticover network, you should have a stronger and more reliable Wi-Fi signal.
Step 4: Configure your Opticover Extender settings– If you want to customize your Opticover Extender settings, you can do so by accessing the extender’s web-based setup page. To access this page, follow these steps:
- Open a web browser on your computer, laptop, or mobile device.
- Type “http://ap.setup” in the address bar and press Enter.
- Enter the username and password provided with your extender.
- Follow the on-screen instructions to configure your extender settings.
Some of the settings you can configure on your Opticover Extender include:
- Network Name (SSID): This is the name of your Opticover network. You can change it to something more recognizable or keep the default name.
- Password: You can change the password for your Opticover network to something more secure.
- Wireless Security Mode: You can choose the security mode for your Opticover network, such as WPA2-PSK or WPA/WPA2-PSK.
- Channel Width: You can choose the channel width for your Opticover network, such as 20 MHz or 40 MHz.
- Wireless Mode: You can choose the wireless mode for your Opticover network, such as 802.11b/g/n or 802.11ac.
- MAC Filtering: You can enable or disable MAC filtering, which allows you to control which devices can connect to your Opticover network.
Once you’ve configured your Opticover Extender settings, make sure to save your changes.
Opticover Extender Setup using WPS and via Web browser
If you’re looking to extend your Wi-Fi network, the Opticover Extender is a great option. This guide will walk you through two different methods for setting up your Opticover Extender: using WPS and via web browser.
Method 1: Setting up your Opticover Extender using WPS
The easiest way to set up your Opticover Extender is to use the WPS (Wi-Fi Protected Setup) feature. This feature allows you to connect your Opticover Extender to your Wi-Fi network without needing to enter a password.
Here’s how to set up your Opticover Extender using WPS:
- Plug in your Opticover Extender and wait for it to power up.
- Locate the WPS button on your Wi-Fi router and press it.
- Within 2 minutes, press the WPS button on your Opticover Extender.
- Wait for the Opticover Extender to connect to your Wi-Fi network.
- Once connected, move your Opticover Extender to a location where it can provide the best coverage.
Method 2: Setting up your Opticover Extender via web browser
If your Wi-Fi router doesn’t have a WPS button or if you prefer to set up your Opticover Extender manually, you can do so using a web browser.
Here’s how to set up your Opticover Extender via web browser:
- Plug in your Opticover Extender and wait for it to power up.
- Connect your computer or mobile device to the Opticover network.
- Open a web browser and navigate to the Opticover Extender setup page (the default address is http://192.168.0.1).
- Enter the default username and password for your Opticover Extender (the default username is “admin” and the default password is “admin”).
- Follow the on-screen instructions to set up your Opticover Extender.
- Once set up, move your Opticover Extender to a location where it can provide the best coverage.
Opticover Extender Setup as an Access Point
The Opticover Extender can also be used as an access point, which allows you to create a new Wi-Fi network in areas where there is no existing Wi-Fi network. This guide will walk you through the steps to set up your Opticover Extender as an access point.
Step 1: Reset your Opticover Extender
Before setting up your Opticover Extender as an access point, it’s recommended that you reset it to its default settings. To do this, locate the reset button on your Opticover Extender and hold it down for at least 10 seconds until the LED lights flash.
Step 2: Connect your Opticover Extender to your router
Connect your Opticover Extender to your router using an Ethernet cable. Plug one end of the Ethernet cable into the LAN port of your router and the other end into the WAN port of your Opticover Extender.
Step 3: Configure your Opticover Extender as an access point
- Connect your computer or mobile device to the Opticover network.
- Open a web browser and navigate to the Opticover Extender setup page (the default address is http://192.168.0.1).
- Enter the default username and password for your Opticover Extender (the default username is “admin” and the default password is “admin”).
- Click on the “Access Point” option from the menu.
- Follow the on-screen instructions to configure your Opticover Extender as an access point.
- Once configured, save the changes and wait for the Opticover Extender to reboot.
Step 4: Connect to your new Wi-Fi network
Once your Opticover Extender has rebooted, connect to your new Wi-Fi network using the SSID and password that you set up during the configuration process.
Tips for using your Opticover Extender as an Access Point
- Use a wired connection: When using your Opticover Extender as an access point, it’s recommended that you connect it to your router using an Ethernet cable. This will ensure the best performance and reliability.
- Find the ideal location: Like with any Wi-Fi device, the location of your Opticover Extender can greatly affect its performance. Try to place it in an area where it can provide the best coverage and avoid placing it near obstructions or interference sources such as microwave ovens or cordless phones.
- Secure your network: When setting up your new Wi-Fi network, make sure to use a strong and unique password to prevent unauthorized access.
How to Reset Your Opticover Extender
If you’re experiencing issues with your Opticover Extender, resetting it to its default settings can help resolve many common problems. This guide will walk you through the steps to reset your Opticover Extender.
Step 1: Locate the reset button
The reset button on your Opticover Extender is usually located on the bottom or back of the device. It may be labeled “reset” or “reboot.”
Step 2: Press and hold the reset button
Using a paperclip or similar tool, press and hold the reset button for at least 10 seconds. The LED lights on your Opticover Extender will flash to indicate that the reset process has started.
Step 3: Wait for the reset process to complete
After holding down the reset button for 10 seconds, release it and wait for the Opticover Extender to reboot. This may take a few minutes, so be patient.
Step 4: Set up your Opticover Extender
After the reset process is complete, your Opticover Extender will be restored to its default settings. You’ll need to set it up again using the setup instructions that came with your device. If you’ve lost your setup instructions, you can usually find them on the Opticover website.
Tips for resetting your Opticover Extender
- Only reset your Opticover Extender when necessary: While resetting your Opticover Extender can help resolve many issues, it should only be done when necessary. Before resetting your device, try other troubleshooting steps such as rebooting your router or moving your extender closer to your router.
- Write down your settings: Before resetting your Opticover Extender, make sure to write down any important settings such as your Wi-Fi network name and password. This will make it easier to set up your device again after the reset process is complete.
- Contact customer support: If you’re still experiencing issues after resetting your Opticover Extender, contact customer support for further assistance.
How to Update the Firmware on Your Opticover Extender
Updating the firmware on your Opticover Extender can help improve its performance and fix any bugs or security vulnerabilities. In this guide, we’ll walk you through the steps to update the firmware on your Opticover Extender.
Step 1: Check for firmware updates
The first step in updating your Opticover Extender firmware is to check if there are any updates available. To do this, you’ll need to log in to the web interface of your extender using a web browser.
Step 2: Log in to the web interface
To log in to the web interface of your Opticover Extender, follow these steps:
- Connect your computer or mobile device to the extender’s network.
- Open a web browser and enter the default IP address of your Opticover Extender. This is usually “192.168.0.1” or “192.168.1.1“.
- Enter your login credentials. The default username and password are usually “admin” and “password”, respectively.
Step 3: Check for firmware updates
Once you’re logged in to the web interface of your Opticover Extender, check for firmware updates by following these steps:
- Click on the “Firmware Upgrade” or “System Upgrade” option in the web interface menu.
- Click on the “Check for Updates” button.
- If there are any available updates, click on the “Upgrade” button to start the firmware update process.
Step 4: Wait for the firmware update to complete
Once you’ve started the firmware update process, wait for it to complete. This may take a few minutes, so be patient and don’t interrupt the update process.
Step 5: Verify the firmware update
After the firmware update is complete, log back in to the web interface of your Opticover Extender and verify that the firmware version has been updated. You should see the new firmware version listed in the “Firmware Upgrade” or “System Upgrade” menu.
Tips for updating your Opticover Extender firmware
- Check for updates regularly: To keep your Opticover Extender running smoothly and securely, it’s a good idea to check for firmware updates regularly.
- Use a wired connection: To avoid any issues during the firmware update process, connect your computer or mobile device to the extender using a wired Ethernet connection instead of a wireless connection.
- Don’t interrupt the update process: Interrupting the firmware update process can cause serious issues with your Opticover Extender. Make sure to let the update process complete before doing anything else.
Also Read – Mercusys Router Setup using mwlogin.net