myrepeater.net is a local web address used to open the setup page (admin dashboard) of many Wireless‑N WiFi repeaters and PIX‑LINK–type devices.
Instead of remembering a numeric IP like 192.168.10.1, you just connect to the repeater and type http://myrepeater.net into your browser to:
- Run the setup wizard
- Connect the repeater to your main WiFi
- Change SSID (WiFi name) and password
- Switch modes (Repeater / AP / Router, if supported)
Important: myrepeater.net only works when your phone/PC is connected to the repeater’s own WiFi network, not your regular home WiFi.
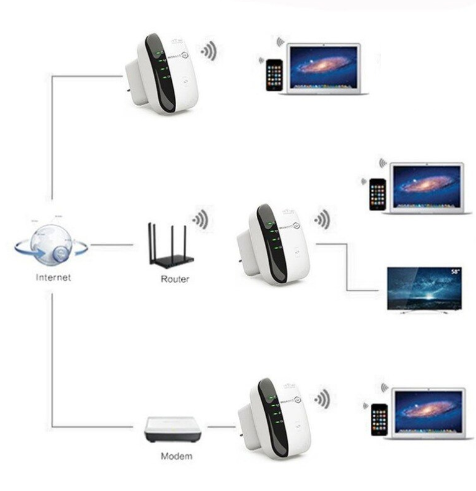
How to Set Up a WiFi Repeater Using myrepeater.net
This works for most Wireless‑N / PIX‑LINK / “WiFi-Repeater” type extenders.
Step 1: Plug In the Repeater
- Plug the repeater into a power socket near your main router (same room is ideal for setup).
- Wait until the power LED is solid.
Step 2: Connect to the Repeater’s WiFi
On your phone or laptop:
- Open WiFi settings.
- Look for a network like “WiFi-Repeater”, “my-repeater”, or a similar default SSID.
- Connect to it.
Step 3: Open the Login Page
- Open a browser (Chrome, Edge, Safari, etc.).
- In the address bar, type:
- http://myrepeater.net
- If that doesn’t load, try http://192.168.10.1 instead.
- Press Enter and wait for the login screen.
Step 4: Log In (Default Username & Password)
On the login page:
- Username:
admin - Password:
admin
(These are the common defaults for Wireless‑N / PIX‑LINK repeaters.)
Click Login / Submit.
Step 5: Run the Setup Wizard (Repeater Mode)
Once inside:
- Look for “Wizard” or “Setup Wizard” and select Repeater Mode.
- The repeater will scan for nearby WiFi networks.
- Select your main WiFi network (router SSID) from the list.
- Enter your router’s WiFi password (the same one you use on your phone to connect to the main WiFi).
- Optionally set a new SSID for the extended network (or keep it the same as your main WiFi).
- Click Apply / Save.
The repeater will reboot. After 30–60 seconds you should see a new or boosted WiFi network (e.g., YourWiFi_EXT or just your original SSID with stronger coverage).
Step 6: Move the Repeater to a Better Spot
Check the signal LEDs: most repeaters show a “good” link with green/blue LEDs when placed correctly.
Unplug the repeater and move it midway between your router and the dead zone.
Plug it back in and wait for lights to stabilize.
If myrepeater.net Is Not Working
This is extremely common. Here are quick checks:
- Make sure you’re connected to the repeater’s WiFi, not your normal router WiFi.
- Try http://192.168.10.1 or sometimes 192.168.1.254 / 192.168.1.1 depending on model.
- Type the address in the address bar, not the search box.
- Disable VPN / ad-blockers / proxy temporarily.
- Use an updated browser and clear cache/cookies if the page half-loads or errors.
- For wired setup, ensure the LAN cable is fully plugged in and your PC is set to DHCP/automatic IP.
If nothing works, perform a factory reset:
- With the repeater powered on, press and hold the RESET pinhole button for about 10 seconds until all LEDs flash.
- Wait for it to reboot, then repeat the setup steps from Step 2 onward.
FAQs
No. It’s a local setup address that only works when you’re connected to the repeater’s own WiFi. It doesn’t work over mobile data or from other networks.
Connect to the repeater SSID first, then try http://192.168.10.1. Most Wireless‑N repeaters use 192.168.10.1 as the actual IP and myrepeater.net as a friendly shortcut.